Configuración de una VPN de acceso remoto con OpenVPN y certificados x509
- Francisco Javier Huete
- Seguridad
- January 29, 2025
Índice
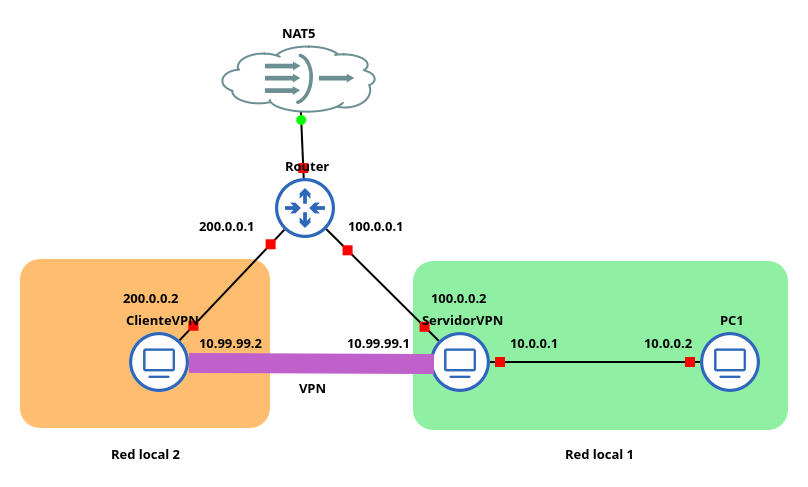
En este post se configura una conexión VPN de acceso remoto entre dos equipos. El servidor está conectado a dos redes, una de ellas está formada por el cliente y la otra por otro equipo a al que el cliente debe acceder a través de la VPN. La VPN usa direcciones de la red 10.99.99.0/24. En esta red, el servidor tiene la IP 10.99.99.1. Así, el escenario está compuesto por cuatro máquinas: en una red sólo está el cliente VPN y, la otra red está formada por el servidor VPN y un equipo interno. Entre ambas redes hay un router de Internet. Por tanto, el escenario queda construido de la siguiente manera:
Instalación de OpenVPN
La instalación de OpenVPN se puede hacer a través de la paquetería disponible en los repositorios de varias distribuciones GNU/Linux, en este caso, el paquete openvpn de los repositorios de Debian instala en el equipo tanto el cliente como el servidor VPN. Por tanto, este paquete se isntala tanto en el equipo servidor como en el equipo cliente.
sudo apt update
sudo apt install openvpn
Creación de la Autoridad Certificadora (CA) y certificados
El primer paso para configurar una VPN usando OpenVPN es generar la estructura de certificados necesaria. Este modelo de certificación requiere del uso de un certificado o clave pública y una clave privada para el servidor y cada uno de los clientes, así como un certificado y clave privada de la Autoridad Certificadora (CA) que, además, debe firmar todos los certificados de los clientes.
Esta estructura permite una autentificación bidireccional basada en certificados en la que el cliente autentifica el certificado del servidor y el servidor autentifica el certificado de cada cliente para poder establecer una confianza mutua. Para ello tanto el cliente como el servidor verifican que el certificado está firmado por la Autoridad Certificadora.
Por tanto, para poder establecer esta estructura en este escenario es necesario generar un certificado y clave de la CA, un certificado y clave del servidor y un certificado y clave del cliente.
OpenVPN cuenta con una herramienta llamada easy-rsa 2 que incluye un conjunto de scripts que facilitan esta tarea de manera que generan tanto la CA como los certificados y claves necesarios de forma automatizada a través de estos scripts. Sin embargo, en este caso, se usa la herramienta OpenSSL para la creación de estos ficheros.
El primer paso para generar todos los certificados necesarios para el funcionamiento de la VPN es crear la Autoridad Certificadora. Para ello, en primer lugar, se crea en el servidor VPN la siguiente estructura de directorios a partir de la raíz /etc/openvpn/server/:
root@debian:/etc/openvpn/server# mkdir -p CA/{certsdb,certreqs,crl,private}
root@debian:/etc/openvpn/server# touch CA/index.txt
A continuación se toma como referencia el fichero de ejemplo /etc/ssl/openssl.cnf para configurar la CA.
root@debian:/etc/openvpn/server# cp /etc/ssl/openssl.cnf ./CA
En este fichero se modifican los siguientes parámetros:
...
[ CA_default ]

dir             = .            # Where everything is kept
certs           = $dir/certsdb          # Where the issued certs are kept
...
new_certs_dir   = $certs                # default place for new certs.
...
req_extensions = v3_req # The extensions to add to a certificate request

[ req_distinguished_name ]
countryName                     = Country Name (2 letter code)
countryName_default             = ES
countryName_min                 = 2
countryName_max                 = 2

stateOrProvinceName             = State or Province Name (full name)
stateOrProvinceName_default     = Andalucia

localityName                    = Locality Name (eg, city)
localityName_default            = Dos Hermanas

0.organizationName              = Organization Name (eg, company)
0.organizationName_default      = IESGN
...
[ req_attributes ]
#challengePassword              = A challenge password
#challengePassword_min          = 4
#challengePassword_max          = 20
...
#unstructuredName               = An optional company name
...
Tras haber configurado la CA se puede generar su par de claves.
root@debian:/etc/openvpn/server/CA# openssl req -new -newkey rsa:2048 -keyout private/cakey.pem -out careq.pem -config openssl.cnf
.......+.......+..+...+.+++++++++++++++++++++++++++++++++++++++++++++++++++++++++++++++++*.+.+.....+.............+..+.......+..+...+...+...+.+...+++++++++++++++++++++++++++++++++++++++++++++++++++++++++++++++++*.+...........+......+............+...............................+...........+...+...+............+......+++++++++++++++++++++++++++++++++++++++++++++++++++++++++++++++++
....+++++++++++++++++++++++++++++++++++++++++++++++++++++++++++++++++*.+.......+...+.....+.+......+......+...+..+...+....+..+....+.....+...............+.+.....+......+...+......+......+.......+.....+...+.......+.....+++++++++++++++++++++++++++++++++++++++++++++++++++++++++++++++++*....+..+..........+...+...+...+..+.........+......+.........+...+.+.........+.....+..........+...+..............+.+............+...+..+......+......+....+.....+....+..+.+...+...........+......+............+.+.....+..........+......+.....+...+.......+.....+.........+.+.........+.....+.......+..+.+......+........+...............+...+.........+.+..+.+.....+.+...........+...+.+...........+.........+.............+...+..+...+....+.........+............+........+.+...+.....+............+.........+.+...+........+..........+.....+...+....+......+.........+..+.........+....+..................+++++++++++++++++++++++++++++++++++++++++++++++++++++++++++++++++
Enter PEM pass phrase:
Verifying - Enter PEM pass phrase:
-----
You are about to be asked to enter information that will be incorporated
into your certificate request.
What you are about to enter is what is called a Distinguished Name or a DN.
There are quite a few fields but you can leave some blank
For some fields there will be a default value,
If you enter '.', the field will be left blank.
-----
Country Name (2 letter code) [ES]:
State or Province Name (full name) [Andalucia]:
Locality Name (eg, city) [Dos Hermanas]:
Organization Name (eg, company) [IESGN]:
Organizational Unit Name (eg, section) []:
Common Name (e.g. server FQDN or YOUR name) []:VPNCA
Email Address []:admin@vpn.org
A continuación, hay que autofirmar el certificado de la CA.
root@debian:/etc/openvpn/server/CA# openssl ca -create_serial -out cacert.pem -days 365 -keyfile private/cakey.pem -selfsign -extensions v3_ca -config openssl.cnf -infiles careq.pem
Using configuration from openssl.cnf
Enter pass phrase for private/cakey.pem:
Check that the request matches the signature
Signature ok
Certificate Details:
        Serial Number:
            72:4f:85:46:41:25:c7:3f:62:45:a1:80:95:ec:3d:70:42:de:56:ce
        Validity
            Not Before: Jan 11 15:37:59 2025 GMT
            Not After : Jan 11 15:37:59 2026 GMT
        Subject:
            countryName               = ES
            stateOrProvinceName       = Andalucia
            organizationName          = IESGN
            commonName                = VPNCA
            emailAddress              = admin@vpn.org
        X509v3 extensions:
            X509v3 Subject Key Identifier:
                48:E8:19:11:32:DF:50:CA:72:6E:20:AF:3E:17:51:C4:02:F5:2F:6D
            X509v3 Authority Key Identifier:
                48:E8:19:11:32:DF:50:CA:72:6E:20:AF:3E:17:51:C4:02:F5:2F:6D
            X509v3 Basic Constraints: critical
                CA:TRUE
Certificate is to be certified until Jan 11 15:37:59 2026 GMT (365 days)
Sign the certificate? [y/n]:y


1 out of 1 certificate requests certified, commit? [y/n]y
Write out database with 1 new entries
Database updated
Además, el servidor debe contar también con su propio certificado firmado por la CA, así que en el directorio /etc/openvp/server se genera una solicitud de certificado.
root@debian:/etc/openvpn/server# openssl req -newkey rsa:4096 -keyout servidor.key -out servidor.csr
...+....+.....+.+.....+.+++++++++++++++++++++++++++++++++++++++++++++++++++++++++++++++++*..........+.........+...+...+...+....+.....+++++++++++++++++++++++++++++++++++++++++++++++++++++++++++++++++*..........+......+...+....+............+...+......+..+...+...............+......+....+............+...+...........+.+.....+...+....+......+.....+......+.....................+....+...+.....+......+....+..+..........+.....+.+........+.+........+++++++++++++++++++++++++++++++++++++++++++++++++++++++++++++++++
..................................+++++++++++++++++++++++++++++++++++++++++++++++++++++++++++++++++*......+++++++++++++++++++++++++++++++++++++++++++++++++++++++++++++++++*.+..........+..............+....+..............+...............+.+.....+...............+.+........+......+....+...+............+...+.....+...+.........+.+...............+......+...+........+...+....+..+.+.................+......+......+.+..+..................+.........+....+.........+..+...+......+....+...+.........+...+......+......+........+.......+......+..............................+..+++++++++++++++++++++++++++++++++++++++++++++++++++++++++++++++++
Enter PEM pass phrase:
Verifying - Enter PEM pass phrase:
-----
You are about to be asked to enter information that will be incorporated
into your certificate request.
What you are about to enter is what is called a Distinguished Name or a DN.
There are quite a few fields but you can leave some blank
For some fields there will be a default value,
If you enter '.', the field will be left blank.
-----
Country Name (2 letter code) [AU]:ES
State or Province Name (full name) [Some-State]:Andalucia
Locality Name (eg, city) []:Dos Hermanas
Organization Name (eg, company) [Internet Widgits Pty Ltd]:IESGN
Organizational Unit Name (eg, section) []:
Common Name (e.g. server FQDN or YOUR name) []:VPNServer
Email Address []:admin@vpnserver.org

Please enter the following 'extra' attributes
to be sent with your certificate request
A challenge password []:
An optional company name []:
Esta solicitud se le pasa a la CA.
root@debian:/etc/openvpn/server# cp servidor.csr CA/certreqs/
Y la CA firma el certificado.
root@debian:/etc/openvpn/server/CA# openssl ca -config openssl.cnf -out certsdb/servidor.crt -infiles certreqs/servidor.csr
Using configuration from openssl.cnf
Enter pass phrase for ./private/cakey.pem:
Check that the request matches the signature
Signature ok
Certificate Details:
        Serial Number:
            72:4f:85:46:41:25:c7:3f:62:45:a1:80:95:ec:3d:70:42:de:56:cf
        Validity
            Not Before: Jan 11 15:43:33 2025 GMT
            Not After : Jan 11 15:43:33 2026 GMT
        Subject:
            countryName               = ES
            stateOrProvinceName       = Andalucia
            organizationName          = IESGN
            commonName                = VPNServer
            emailAddress              = admin@vpnserver.org
        X509v3 extensions:
            X509v3 Basic Constraints:
                CA:FALSE
            X509v3 Subject Key Identifier:
                25:1B:D2:22:7F:DA:08:8E:06:6E:B1:0E:1C:AC:0A:01:A9:D3:09:3B
            X509v3 Authority Key Identifier:
                48:E8:19:11:32:DF:50:CA:72:6E:20:AF:3E:17:51:C4:02:F5:2F:6D
Certificate is to be certified until Jan 11 15:43:33 2026 GMT (365 days)
Sign the certificate? [y/n]:y


1 out of 1 certificate requests certified, commit? [y/n]y
Write out database with 1 new entries
Database updated
Para completar la estructura de certificados que permite la validación del servidor y el cliente que intervienen en esta VPN, falta por generar el certificado del cliente, esta vez, desde el directorio /etc/openvpn/client en el equipo cliente.
root@debian:/etc/openvpn/client# openssl req -newkey rsa:4096 -keyout cliente.key -out cliente.csr
..+.+..+++++++++++++++++++++++++++++++++++++++++++++++++++++++++++++++++*..+..+.......+.....+.+.....+....+...+++++++++++++++++++++++++++++++++++++++++++++++++++++++++++++++++*.+.........................+......+...+.....+.........+..................+.......+..+..................+.+.........+........+...+....+........+....+...+..+..........+.....+.+...+......+...+...+.....+.......+..+.........+....+......+......+........+...+..................+....+.......................+...+.+...+...............+...+.....+.............+..+.........+.............+......+.....+.......................................+...+.......+..+.+............+.....+..........+..+.............+...+..+...+...................+.....+.+..............+.........+....+..+....+..+...+...................+..+...+................+..+..........+...+...........+....+......+........+............+.+.....+.......+.....+.+......+..............+...............+.+.....+....+...........+.+........+.+....................+..................+..........+........+.......+.................................+..+...............+...+...+......+....+..+..........+........................+........+.+..+..........+...+...........+....+.....+.+..............+.+..............+......+.+++++++++++++++++++++++++++++++++++++++++++++++++++++++++++++++++
.+......................+...+........+....+...........+.+...............+++++++++++++++++++++++++++++++++++++++++++++++++++++++++++++++++*.....+.+.....+...+....+...+.....+....+.........+.........+...+...+.........+......+..+...+....+.....+......+.+.....+....+......+++++++++++++++++++++++++++++++++++++++++++++++++++++++++++++++++*...+...................+..+...+.......+......+..................+..............+......+....+......+.........+...........+.+.........+.........+.....................+.....+....+...+..+.+..+.......+..+.........+.........+.......+........+.............+..............+...+......+.......+.....+.........+......+...................+...+......+.........+..+....+......+.....+......+...+....+..+..........+...+..+....+...........+.+..+...+.......+.....+.......+...............+.....+...............+.+..+......+............+....+.....+....+.........+......+......+.....+....+..+...+...................+..+....+.....+.+.......................+......+.+...+.................+.+..+.+..+..................+.........+...+.........+.+........+..........+.................+.......+...+............+++++++++++++++++++++++++++++++++++++++++++++++++++++++++++++++++
Enter PEM pass phrase:
Verifying - Enter PEM pass phrase:
-----
You are about to be asked to enter information that will be incorporated
into your certificate request.
What you are about to enter is what is called a Distinguished Name or a DN.
There are quite a few fields but you can leave some blank
For some fields there will be a default value,
If you enter '.', the field will be left blank.
-----
Country Name (2 letter code) [AU]:ES
State or Province Name (full name) [Some-State]:Andalucia
Locality Name (eg, city) []:Dos Hermanas
Organization Name (eg, company) [Internet Widgits Pty Ltd]:IESGN
Organizational Unit Name (eg, section) []:
Common Name (e.g. server FQDN or YOUR name) []:VPNClient
Email Address []:cliente@vpnserver.org

Please enter the following 'extra' attributes
to be sent with your certificate request
A challenge password []:
An optional company name []:
Esta solicitud se envía a la CA.
root@debian:/etc/openvpn/client# scp cliente.csr debian@192.168.122.243:/home/debian
cliente.csr                                  100% 1736   438.2KB/s   00:00
Y la firma.
root@debian:/etc/openvpn/server/CA# openssl ca -config openssl.cnf -out certsdb/cliente.crt -infiles certreqs/cliente.csr
Using configuration from openssl.cnf
Enter pass phrase for ./private/cakey.pem:
Check that the request matches the signature
Signature ok
Certificate Details:
        Serial Number:
            72:4f:85:46:41:25:c7:3f:62:45:a1:80:95:ec:3d:70:42:de:56:d0
        Validity
            Not Before: Jan 11 15:53:13 2025 GMT
            Not After : Jan 11 15:53:13 2026 GMT
        Subject:
            countryName               = ES
            stateOrProvinceName       = Andalucia
            organizationName          = IESGN
            commonName                = VPNClient
            emailAddress              = cliente@vpnserver.org
        X509v3 extensions:
            X509v3 Basic Constraints:
                CA:FALSE
            X509v3 Subject Key Identifier:
                4F:02:55:C5:7C:D2:69:C0:F5:77:5C:72:CC:EE:55:87:E3:7E:69:9B
            X509v3 Authority Key Identifier:
                48:E8:19:11:32:DF:50:CA:72:6E:20:AF:3E:17:51:C4:02:F5:2F:6D
Certificate is to be certified until Jan 11 15:53:13 2026 GMT (365 days)
Sign the certificate? [y/n]:y


1 out of 1 certificate requests certified, commit? [y/n]y
Write out database with 1 new entries
Database updated
Por último, la CA devuelve el certificado del cliente firmado junto a su propio certificado autofirmado al cliente para que también pueda verificar la identidad del servidor VPN en las conexiones.
root@debian:/etc/openvpn/server/CA# scp certsdb/cliente.crt debian@192.168.122.147:/home/debian
cliente.crt                                   100% 5922   536.4KB/s   00:00
root@debian:/etc/openvpn/server/CA# scp cacert.pem debian@192.168.122.147:/home/debian
cacert.pem                                    100% 4439   601.8KB/s   00:00
En el cliente, estos certificados también se almacena en el directorio /etc/openvpn/client.
El último elemento pendiente de generar en esta estructra de certificados es el fichero de parámetros Diffie-Hellman. Las claves de intercambio Diffie-Hellman son un método matemático que permite generar una clave criptográfica simétrica de manera segura. Este método de intercambio de claves simétricas permite que dos partes que no han tenido comunicación previa establezcan una clave compartida de forma segura sobre un canal inseguro. Este fichero también se puede generar de forma sencilla usando las herramientas que incorpora OpenVPN o, con un breve comando usando la opción dhparam de la herramienta openssl. La ejecución de este comando puede alargarse de varios minutos a varias horas según el nivel de seguridad que se indique y la capacidad de cómputo del equipo. En este caso, se opta por generar un fichero de 4096 bits que, en la MV de GNS3 con la que se está trabajando necesita más de media hora para generar el fichero.
root@debian:/etc/openvpn/server# openssl dhparam -out dhparams.pem 4096
Generating DH parameters, 4096 bit long safe prime
........................................................+.................................................................................................................................................................................................................................................................................................+......................................................................................................................................................................................................................................................................................................................+.........................................+..............................................................................................................................................................................................................................................................................+..........+..........................................................
...
.......+.................................................................................................+.....................................................................................................................................................................................+...............................................................................................++*++*++*++*++*++*++*++*++*++*++*++*++*++*++*++*++*++*++*++*++*++*++*++*++*++*++*++*++*++*++*++*++*++*++*++*++*++*++*++*++*++*++*++*++*++*++*++*++*++*++*++*++*++*++*++*++*++*++*++*++*++*++*++*++*++*++*++*++*++*++*++*++*++*++*++*++*++*++*++*++*++*++*++*++*++*++*++*++*++*++*++*++*++*++*++*++*++*++*++*++*++*++*++*++*++*++*++*++*++*++*++*++*++*++*++*++*++*++*++*++*++*++*++*++*++*++*++*
Así, un esquema de la estructura de certificados elaborada se puede representar en la siguiente tabla:
| Fichero | Ubicación |
|---|---|
| cacert.pem | servidor y cliente |
| cakey.pem | servidor (CA) |
| dhparams.pem | servidor |
| servidor.crt | servidor |
| servidor.key | servidor |
| cliente.crt | cliente |
| cliente.key | cliente |
Configuración del servidor VPN
La instalación del paquete openvpn genera un directorio en el sistema en el que se almacenan varios ficheros de configuración de ejemplo tanto para configurar el servidor como el cliente VPN. A partir de estos ficheros de ejemplo se pueden configurar de forma más sencilla ambas partes de la VPN.
Así que, para empezar con la configuración del servidor VPN se puede copiar este fichero de ejemplo al directorio /etc/openvpn/server.
root@debian:/etc/openvpn/server# cp /usr/share/doc/openvpn/examples/sample-config-files/server.conf .
Por defecto, este fichero configura el servidor para escuchar en el puerto 1194, usar el protocolo UDP, crear una interfaz tun que crea un túnel IP para enrutar el tráfico de la VPN. En el apartado de certificados SSL hay que indicar la ruta a los certificados necesarios par el funcionamiento del servidor: el certificado de la CA, el del servidor y la clave privada del servidor, así como el fichero de parámetros Diffie-Hellman.
ca cacert.pem
cert servidor.crt
key servidor.key  # This file should be kept secret

# Diffie hellman parameters.
# Generate your own with:
#   openssl dhparam -out dh2048.pem 2048
dh dhparams.pem
Después hay que configurar los parámetros relacionados con la red como el tipo de topología, en este caso subnet para que permita el direccionamiento IP y el direccionamiento de la red de la VPN, en este caso, se configura la 10.99.99.0/24.
# Network topology
# Should be subnet (addressing via IP)
# unless Windows clients v2.0.9 and lower have to
# be supported (then net30, i.e. a /30 per client)
# Defaults to net30 (not recommended)
topology subnet

# Configure server mode and supply a VPN subnet
# for OpenVPN to draw client addresses from.
# The server will take 10.8.0.1 for itself,
# the rest will be made available to clients.
# Each client will be able to reach the server
# on 10.8.0.1. Comment this line out if you are
# ethernet bridging. See the man page for more info.
server 10.99.99.0 255.255.255.0
En el resto de parámetros como el tipo de compresión, el tipo de cifrado, el tiempo de “keepalive”, etc. se mantienen los valores por defecto.
También por defecto, la configuración de OpenVPN incluye un parámetro extra de seguridad cuyo uso es opcional. Para deshabilitarlo, es necesario comentar la siguiente línea del fichero de configuración:
# For extra security beyond that provided
# by SSL/TLS, create an "HMAC firewall"
# to help block DoS attacks and UDP port flooding.
#
# Generate with:
#   openvpn --genkey tls-auth ta.key
#
# The server and each client must have
# a copy of this key.
# The second parameter should be '0'
# on the server and '1' on the clients.
;tls-auth ta.key 0 # This file is secret
Además, para que systemd pueda usar la frase de paso de la clave privada del servidor hay que indicarla en un fichero al que también se hace referencia en la configuración del servidor VPN.
echo "contraseña" > auth.txt
Así, en el fichero de configuración del servidor VPN quedan recogido los siguientes parámetros y valores:
debian@debian:~$ cat /etc/openvpn/server/server.conf
#################################################
# Sample OpenVPN 2.0 config file for            #
# multi-client server.                          #
#                                               #
# This file is for the server side              #
# of a many-clients <-> one-server              #
# OpenVPN configuration.                        #
#                                               #
# OpenVPN also supports                         #
# single-machine <-> single-machine             #
# configurations (See the Examples page         #
# on the web site for more info).               #
#                                               #
# This config should work on Windows            #
# or Linux/BSD systems.  Remember on            #
# Windows to quote pathnames and use            #
# double backslashes, e.g.:                     #
# "C:\\Program Files\\OpenVPN\\config\\foo.key" #
#                                               #
# Comments are preceded with '#' or ';'         #
#################################################

# Which local IP address should OpenVPN
# listen on? (optional)
;local a.b.c.d

# Which TCP/UDP port should OpenVPN listen on?
# If you want to run multiple OpenVPN instances
# on the same machine, use a different port
# number for each one.  You will need to
# open up this port on your firewall.
port 1194

# TCP or UDP server?
;proto tcp
proto udp

# "dev tun" will create a routed IP tunnel,
# "dev tap" will create an ethernet tunnel.
# Use "dev tap0" if you are ethernet bridging
# and have precreated a tap0 virtual interface
# and bridged it with your ethernet interface.
# If you want to control access policies
# over the VPN, you must create firewall
# rules for the the TUN/TAP interface.
# On non-Windows systems, you can give
# an explicit unit number, such as tun0.
# On Windows, use "dev-node" for this.
# On most systems, the VPN will not function
# unless you partially or fully disable
# the firewall for the TUN/TAP interface.
;dev tap
dev tun

# Windows needs the TAP-Win32 adapter name
# from the Network Connections panel if you
# have more than one.  On XP SP2 or higher,
# you may need to selectively disable the
# Windows firewall for the TAP adapter.
# Non-Windows systems usually don't need this.
;dev-node MyTap

# SSL/TLS root certificate (ca), certificate
# (cert), and private key (key).  Each client
# and the server must have their own cert and
# key file.  The server and all clients will
# use the same ca file.
#
# See the "easy-rsa" directory for a series
# of scripts for generating RSA certificates
# and private keys.  Remember to use
# a unique Common Name for the server
# and each of the client certificates.
#
# Any X509 key management system can be used.
# OpenVPN can also use a PKCS #12 formatted key file
# (see "pkcs12" directive in man page).
ca cacert.pem
cert servidor.crt
key servidor.key  # This file should be kept secret

# Diffie hellman parameters.
# Generate your own with:
#   openssl dhparam -out dh2048.pem 2048
dh dhparams.pem

# Network topology
# Should be subnet (addressing via IP)
# unless Windows clients v2.0.9 and lower have to
# be supported (then net30, i.e. a /30 per client)
# Defaults to net30 (not recommended)
topology subnet

# Configure server mode and supply a VPN subnet
# for OpenVPN to draw client addresses from.
# The server will take 10.8.0.1 for itself,
# the rest will be made available to clients.
# Each client will be able to reach the server
# on 10.8.0.1. Comment this line out if you are
# ethernet bridging. See the man page for more info.
server 10.99.99.0 255.255.255.0

# Maintain a record of client <-> virtual IP address
# associations in this file.  If OpenVPN goes down or
# is restarted, reconnecting clients can be assigned
# the same virtual IP address from the pool that was
# previously assigned.
ifconfig-pool-persist /var/log/openvpn/ipp.txt

# Configure server mode for ethernet bridging.
# You must first use your OS's bridging capability
# to bridge the TAP interface with the ethernet
# NIC interface.  Then you must manually set the
# IP/netmask on the bridge interface, here we
# assume 10.8.0.4/255.255.255.0.  Finally we
# must set aside an IP range in this subnet
# (start=10.8.0.50 end=10.8.0.100) to allocate
# to connecting clients.  Leave this line commented
# out unless you are ethernet bridging.
;server-bridge 10.8.0.4 255.255.255.0 10.8.0.50 10.8.0.100

# Configure server mode for ethernet bridging
# using a DHCP-proxy, where clients talk
# to the OpenVPN server-side DHCP server
# to receive their IP address allocation
# and DNS server addresses.  You must first use
# your OS's bridging capability to bridge the TAP
# interface with the ethernet NIC interface.
# Note: this mode only works on clients (such as
# Windows), where the client-side TAP adapter is
# bound to a DHCP client.
;server-bridge

# Push routes to the client to allow it
# to reach other private subnets behind
# the server.  Remember that these
# private subnets will also need
# to know to route the OpenVPN client
# address pool (10.8.0.0/255.255.255.0)
# back to the OpenVPN server.
push "route 10.0.0.0 255.255.255.0"
;push "route 192.168.20.0 255.255.255.0"

# To assign specific IP addresses to specific
# clients or if a connecting client has a private
# subnet behind it that should also have VPN access,
# use the subdirectory "ccd" for client-specific
# configuration files (see man page for more info).

# EXAMPLE: Suppose the client
# having the certificate common name "Thelonious"
# also has a small subnet behind his connecting
# machine, such as 192.168.40.128/255.255.255.248.
# First, uncomment out these lines:
;client-config-dir ccd
;route 192.168.40.128 255.255.255.248
# Then create a file ccd/Thelonious with this line:
#   iroute 192.168.40.128 255.255.255.248
# This will allow Thelonious' private subnet to
# access the VPN.  This example will only work
# if you are routing, not bridging, i.e. you are
# using "dev tun" and "server" directives.

# EXAMPLE: Suppose you want to give
# Thelonious a fixed VPN IP address of 10.9.0.1.
# First uncomment out these lines:
;client-config-dir ccd
;route 10.9.0.0 255.255.255.252
# Then add this line to ccd/Thelonious:
#   ifconfig-push 10.9.0.1 10.9.0.2

# Suppose that you want to enable different
# firewall access policies for different groups
# of clients.  There are two methods:
# (1) Run multiple OpenVPN daemons, one for each
#     group, and firewall the TUN/TAP interface
#     for each group/daemon appropriately.
# (2) (Advanced) Create a script to dynamically
#     modify the firewall in response to access
#     from different clients.  See man
#     page for more info on learn-address script.
;learn-address ./script

# If enabled, this directive will configure
# all clients to redirect their default
# network gateway through the VPN, causing
# all IP traffic such as web browsing and
# and DNS lookups to go through the VPN
# (The OpenVPN server machine may need to NAT
# or bridge the TUN/TAP interface to the internet
# in order for this to work properly).
;push "redirect-gateway def1 bypass-dhcp"

# Certain Windows-specific network settings
# can be pushed to clients, such as DNS
# or WINS server addresses.  CAVEAT:
# http://openvpn.net/faq.html#dhcpcaveats
# The addresses below refer to the public
# DNS servers provided by opendns.com.
;push "dhcp-option DNS 208.67.222.222"
;push "dhcp-option DNS 208.67.220.220"

# Uncomment this directive to allow different
# clients to be able to "see" each other.
# By default, clients will only see the server.
# To force clients to only see the server, you
# will also need to appropriately firewall the
# server's TUN/TAP interface.
;client-to-client

# Uncomment this directive if multiple clients
# might connect with the same certificate/key
# files or common names.  This is recommended
# only for testing purposes.  For production use,
# each client should have its own certificate/key
# pair.
#
# IF YOU HAVE NOT GENERATED INDIVIDUAL
# CERTIFICATE/KEY PAIRS FOR EACH CLIENT,
# EACH HAVING ITS OWN UNIQUE "COMMON NAME",
# UNCOMMENT THIS LINE OUT.
;duplicate-cn

# The keepalive directive causes ping-like
# messages to be sent back and forth over
# the link so that each side knows when
# the other side has gone down.
# Ping every 10 seconds, assume that remote
# peer is down if no ping received during
# a 120 second time period.
keepalive 10 120

# For extra security beyond that provided
# by SSL/TLS, create an "HMAC firewall"
# to help block DoS attacks and UDP port flooding.
#
# Generate with:
#   openvpn --genkey tls-auth ta.key
#
# The server and each client must have
# a copy of this key.
# The second parameter should be '0'
# on the server and '1' on the clients.
;tls-auth ta.key 0 # This file is secret

# Select a cryptographic cipher.
# This config item must be copied to
# the client config file as well.
# Note that v2.4 client/server will automatically
# negotiate AES-256-GCM in TLS mode.
# See also the ncp-cipher option in the manpage
cipher AES-256-CBC

# Enable compression on the VPN link and push the
# option to the client (v2.4+ only, for earlier
# versions see below)
;compress lz4-v2
;push "compress lz4-v2"

# For compression compatible with older clients use comp-lzo
# If you enable it here, you must also
# enable it in the client config file.
;comp-lzo

# The maximum number of concurrently connected
# clients we want to allow.
;max-clients 100

# It's a good idea to reduce the OpenVPN
# daemon's privileges after initialization.
#
# You can uncomment this on non-Windows
# systems after creating a dedicated user.
;user openvpn
;group openvpn

# The persist options will try to avoid
# accessing certain resources on restart
# that may no longer be accessible because
# of the privilege downgrade.
persist-key
persist-tun

# Output a short status file showing
# current connections, truncated
# and rewritten every minute.
status /var/log/openvpn/openvpn-status.log

# By default, log messages will go to the syslog (or
# on Windows, if running as a service, they will go to
# the "\Program Files\OpenVPN\log" directory).
# Use log or log-append to override this default.
# "log" will truncate the log file on OpenVPN startup,
# while "log-append" will append to it.  Use one
# or the other (but not both).
;log         /var/log/openvpn/openvpn.log
;log-append  /var/log/openvpn/openvpn.log

# Set the appropriate level of log
# file verbosity.
#
# 0 is silent, except for fatal errors
# 4 is reasonable for general usage
# 5 and 6 can help to debug connection problems
# 9 is extremely verbose
verb 3

# Silence repeating messages.  At most 20
# sequential messages of the same message
# category will be output to the log.
;mute 20

# Notify the client that when the server restarts so it
# can automatically reconnect.
explicit-exit-notify 1

#Fichero de constraseña de la clave
askpass auth.txt
El servidor VPN se puede arrancar usando systemd pero el paquete openvpn incluye una herramienta de depuración que se recomienda usar en los primeros inicios del servidor. Cuando la salida del comando muestra la siguiente información la configuración del servidor es correcta:
root@debian:/etc/openvpn/server# openvpn server.conf
2025-01-11 18:02:30 DEPRECATED OPTION: --cipher set to 'AES-256-CBC' but missing in --data-ciphers (AES-256-GCM:AES-128-GCM:CHACHA20-POLY1305). OpenVPN ignores --cipher for cipher negotiations.
2025-01-11 18:02:30 Note: Kernel support for ovpn-dco missing, disabling data channel offload.
2025-01-11 18:02:30 OpenVPN 2.6.3 x86_64-pc-linux-gnu [SSL (OpenSSL)] [LZO] [LZ4] [EPOLL] [PKCS11] [MH/PKTINFO] [AEAD] [DCO]
2025-01-11 18:02:30 library versions: OpenSSL 3.0.13 30 Jan 2024, LZO 2.10
2025-01-11 18:02:30 DCO version: N/A
2025-01-11 18:02:30 net_route_v4_best_gw query: dst 0.0.0.0
2025-01-11 18:02:30 net_route_v4_best_gw result: via 192.168.122.1 dev ens5
2025-01-11 18:02:30 Diffie-Hellman initialized with 4096 bit key
Enter Private Key Password: *******
2025-01-11 18:02:32 WARNING: this configuration may cache passwords in memory -- use the auth-nocache option to prevent this
[  180.660097] tun: Universal TUN/TAP device driver, 1.6
2025-01-11 18:02:32 TUN/TAP device tun0 opened
2025-01-11 18:02:32 net_iface_mtu_set: mtu 1500 for tun0
2025-01-11 18:02:32 net_iface_up: set tun0 up
2025-01-11 18:02:32 net_addr_v4_add: 10.99.99.1/24 dev tun0
2025-01-11 18:02:32 Could not determine IPv4/IPv6 protocol. Using AF_INET
2025-01-11 18:02:32 Socket Buffers: R=[212992->212992] S=[212992->212992]
2025-01-11 18:02:32 UDPv4 link local (bound): [AF_INET][undef]:1194
2025-01-11 18:02:32 UDPv4 link remote: [AF_UNSPEC]
2025-01-11 18:02:32 MULTI: multi_init called, r=256 v=256
2025-01-11 18:02:32 IFCONFIG POOL IPv4: base=10.99.99.2 size=253
2025-01-11 18:02:32 IFCONFIG POOL LIST
2025-01-11 18:02:32 Initialization Sequence Completed
Una vez que se ha verificado el correcto funcionamiento del servidor VPN se puede usar systemd para arrancarlo.
systemctl start openvpn-server@server
Al arrancar la VPN se crea una nueva interfaz de red virtual (tun0) con la IP 10.99.99.1.
root@debian:/etc/openvpn/server# ip a
1: lo: <LOOPBACK,UP,LOWER_UP> mtu 65536 qdisc noqueue state UNKNOWN group default qlen 1000
    link/loopback 00:00:00:00:00:00 brd 00:00:00:00:00:00
    inet 127.0.0.1/8 scope host lo
       valid_lft forever preferred_lft forever
    inet6 ::1/128 scope host noprefixroute
       valid_lft forever preferred_lft forever
2: ens4: <BROADCAST,MULTICAST,UP,LOWER_UP> mtu 1500 qdisc fq_codel state UP group default qlen 1000
    link/ether 0c:bc:63:18:00:00 brd ff:ff:ff:ff:ff:ff
    altname enp0s4
    inet 10.0.0.1/24 brd 10.0.0.255 scope global ens4
       valid_lft forever preferred_lft forever
    inet6 fe80::ebc:63ff:fe18:0/64 scope link
       valid_lft forever preferred_lft forever
3: ens5: <BROADCAST,MULTICAST,UP,LOWER_UP> mtu 1500 qdisc fq_codel state UP group default qlen 1000
    link/ether 0c:bc:63:18:00:01 brd ff:ff:ff:ff:ff:ff
    altname enp0s5
    inet 100.0.0.2/24 brd 100.0.0.255 scope global ens5
       valid_lft forever preferred_lft forever
    inet6 fe80::ebc:63ff:fe18:1/64 scope link
       valid_lft forever preferred_lft forever
4: tun0: <POINTOPOINT,MULTICAST,NOARP,UP,LOWER_UP> mtu 1500 qdisc fq_codel state UNKNOWN group default qlen 500
    link/none
    inet 10.99.99.1/24 scope global tun0
       valid_lft forever preferred_lft forever
    inet6 fe80::1516:5e8c:5b38:b02/64 scope link stable-privacy
       valid_lft forever preferred_lft forever
Además, también se crea una ruta en la tabla de enrutamiento.
root@debian:/etc/openvpn/server# ip r
default via 100.0.0.1 dev ens5 onlink
10.0.0.0/24 dev ens4 proto kernel scope link src 10.0.0.1
10.99.99.0/24 dev tun0 proto kernel scope link src 10.99.99.1
100.0.0.0/24 dev ens5 proto kernel scope link src 100.0.0.2
Configuración del cliente VPN
Para configurar el cliente también se puede partir del fichero de configuración de ejemplo proporcionado por OpenVPN.
root@debian:/etc/openvpn/client# cp /usr/share/doc/openvpn/examples/sample-config-files/client.conf .
Este fichero también crea por defecto una interfaz de tipo tun y configura el uso del protocolo udp para la VPN. Entre los parámetros que se deben modificar están la dirección IP y puerto de escucha del servidor y la ruta relativa a los cetificados de la CA, del cliente y a la clave del cliente
# The hostname/IP and port of the server.
# You can have multiple remote entries
# to load balance between the servers.
remote 10.99.99.1 1194
...
# SSL/TLS parms.
# See the server config file for more
# description.  It's best to use
# a separate .crt/.key file pair
# for each client.  A single ca
# file can be used for all clients.
ca cacert.pem
cert cliente.crt
key cliente.key
Finalmente, el contenido íntegro del fichero de configuración del cliente VPN es el siguiente:
debian@debian:~$ cat /etc/openvpn/client/client.conf
##############################################
# Sample client-side OpenVPN 2.0 config file #
# for connecting to multi-client server.     #
#                                            #
# This configuration can be used by multiple #
# clients, however each client should have   #
# its own cert and key files.                #
#                                            #
# On Windows, you might want to rename this  #
# file so it has a .ovpn extension           #
##############################################

# Specify that we are a client and that we
# will be pulling certain config file directives
# from the server.
client

# Use the same setting as you are using on
# the server.
# On most systems, the VPN will not function
# unless you partially or fully disable
# the firewall for the TUN/TAP interface.
;dev tap
dev tun

# Windows needs the TAP-Win32 adapter name
# from the Network Connections panel
# if you have more than one.  On XP SP2,
# you may need to disable the firewall
# for the TAP adapter.
;dev-node MyTap

# Are we connecting to a TCP or
# UDP server?  Use the same setting as
# on the server.
;proto tcp
proto udp

# The hostname/IP and port of the server.
# You can have multiple remote entries
# to load balance between the servers.
remote 100.0.0.2 1194
;remote my-server-2 1194

# Choose a random host from the remote
# list for load-balancing.  Otherwise
# try hosts in the order specified.
;remote-random

# Keep trying indefinitely to resolve the
# host name of the OpenVPN server.  Very useful
# on machines which are not permanently connected
# to the internet such as laptops.
resolv-retry infinite

# Most clients don't need to bind to
# a specific local port number.
nobind

# Downgrade privileges after initialization (non-Windows only)
;user openvpn
;group openvpn

# Try to preserve some state across restarts.
persist-key
persist-tun

# If you are connecting through an
# HTTP proxy to reach the actual OpenVPN
# server, put the proxy server/IP and
# port number here.  See the man page
# if your proxy server requires
# authentication.
;http-proxy-retry # retry on connection failures
;http-proxy [proxy server] [proxy port #]

# Wireless networks often produce a lot
# of duplicate packets.  Set this flag
# to silence duplicate packet warnings.
;mute-replay-warnings

# SSL/TLS parms.
# See the server config file for more
# description.  It's best to use
# a separate .crt/.key file pair
# for each client.  A single ca
# file can be used for all clients.
ca cacert.pem
cert cliente.crt
key cliente.key

# Verify server certificate by checking that the
# certificate has the correct key usage set.
# This is an important precaution to protect against
# a potential attack discussed here:
#  http://openvpn.net/howto.html#mitm
#
# To use this feature, you will need to generate
# your server certificates with the keyUsage set to
#   digitalSignature, keyEncipherment
# and the extendedKeyUsage to
#   serverAuth
# EasyRSA can do this for you.
#remote-cert-tls server

# If a tls-auth key is used on the server
# then every client must also have the key.
#tls-auth ta.key 1

# Select a cryptographic cipher.
# If the cipher option is used on the server
# then you must also specify it here.
# Note that v2.4 client/server will automatically
# negotiate AES-256-GCM in TLS mode.
# See also the data-ciphers option in the manpage
cipher AES-256-CBC

# Enable compression on the VPN link.
# Don't enable this unless it is also
# enabled in the server config file.
#comp-lzo

# Set log file verbosity.
verb 3

# Silence repeating messages
;mute 20

#Fichero de contraseña de la clave privada
askpass auth.txt
Como ocurre en el caso del servidor, en el cliente también se puede usar la utilidad openvpn para verificar la sintaxis del fichero de configuración y probar la ejecución de la VPN. Después, se puede arrancar usando systemd.
sudo systemctl start openvpn-client@client
Al arrancar el cliente de VPN, se crea una nueva interfaz de red de tipo tun (tun0) con la IP 10.99.99.2.
root@debian:/etc/openvpn/client# ip a
1: lo: <LOOPBACK,UP,LOWER_UP> mtu 65536 qdisc noqueue state UNKNOWN group default qlen 1000
    link/loopback 00:00:00:00:00:00 brd 00:00:00:00:00:00
    inet 127.0.0.1/8 scope host lo
       valid_lft forever preferred_lft forever
    inet6 ::1/128 scope host noprefixroute
       valid_lft forever preferred_lft forever
2: ens4: <BROADCAST,MULTICAST,UP,LOWER_UP> mtu 1500 qdisc fq_codel state UP group default qlen 1000
    link/ether 0c:1e:38:43:00:00 brd ff:ff:ff:ff:ff:ff
    altname enp0s4
    inet 200.0.0.2/24 brd 200.0.0.255 scope global ens4
       valid_lft forever preferred_lft forever
    inet6 fe80::e1e:38ff:fe43:0/64 scope link
       valid_lft forever preferred_lft forever
3: tun0: <POINTOPOINT,MULTICAST,NOARP,UP,LOWER_UP> mtu 1500 qdisc fq_codel state UNKNOWN group default qlen 500
    link/none
    inet 10.99.99.2/24 scope global tun0
       valid_lft forever preferred_lft forever
    inet6 fe80::dc6d:524c:186d:ced1/64 scope link stable-privacy
       valid_lft forever preferred_lft forever
También aparecen dos nuevas rutas en la tabla de enrutamiento: la ruta hacia la red 10.99.99.0/24, como también se incluye en la tabla de enrutamiento del servidor pero, además, en el cliente se añade la ruta hacia la red 10.0.0.0/24, que se corresponde con la red local a la que da el servidor de VPN.
root@debian:/etc/openvpn/client# ip r
default via 200.0.0.1 dev ens4 onlink
10.0.0.0/24 via 10.99.99.1 dev tun0
10.99.99.0/24 dev tun0 proto kernel scope link src 10.99.99.2
200.0.0.0/24 dev ens4 proto kernel scope link src 200.0.0.2
Una vez que la VPN está funcionando, el cliente puede comunicarse con el equipo de la red local que está conectado al servidor VPN.
root@debian:/etc/openvpn/client# ping -c4 10.0.0.2
PING 10.0.0.2 (10.0.0.2) 56(84) bytes of data.
64 bytes from 10.0.0.2: icmp_seq=1 ttl=63 time=2.27 ms
64 bytes from 10.0.0.2: icmp_seq=2 ttl=63 time=3.96 ms
64 bytes from 10.0.0.2: icmp_seq=3 ttl=63 time=2.08 ms
64 bytes from 10.0.0.2: icmp_seq=4 ttl=63 time=3.59 ms

--- 10.0.0.2 ping statistics ---
4 packets transmitted, 4 received, 0% packet loss, time 3005ms
rtt min/avg/max/mdev = 2.078/2.974/3.963/0.815 ms
Además, se puede comprobar que esta conexión se realiza de forma segura a través de la red VPN que se ha configurado.
debian@debian:~$ traceroute 10.0.0.2
traceroute to 10.0.0.2 (10.0.0.2), 30 hops max, 60 byte packets
 1  10.99.99.1 (10.99.99.1)  8.065 ms  7.889 ms  7.673 ms
 2  10.0.0.2 (10.0.0.2)  7.634 ms  7.610 ms  7.570 ms
En una captura de tráfico entre el cliente y el servidor también se puede apreciar cómo los paquetes de este ping entre el cliente y el equipo de la red interna del servidor VPN viajan cifrados. En la captura se muestran como paquetes del protocolo OpenVPN y no se puede ver su contenido. Además, en la captura de tráfico sí que se puede ver la dirección IP real de origen y destino de cada paquete en vez de la IP virtual que se usa internamente para enviar el tráfico a través de la VPN.